Clothing Measurement Guide for Accurate Online Shopping
You've probably had this happen, a shirt looked perfect online, then it arrived with a shoulder line that felt off and sleeves that didn't land where you expected. A clothing measurement guide helps cut through that frustration, because size labels alone can't tell you how a garment will compare across brands, listings, or resale photos.
That matters even more now, since standardized sizing has long been formalized in measurement systems, but no universal standard exists and a guide is still essential for online and cross-brand comparisons today, as reflected in the U.S. government's body-measurement standard for ready-to-wear clothing and pattern guidance (government standard reference). If you're comparing Zara, H&M, Amazon, Depop, or a thrift listing, the fastest way to reduce guesswork is to compare exact measurements, not just the size tag. For shoppers dealing with body changes too, learn about losing inches can be a useful reminder that measurements can shift even when the scale doesn't.
For secondhand browsing, I also like starting with a category-specific comparison page such as this thrift-store online shopping guide, because resale sellers often list garment dimensions rather than a dependable size label. That simple shift, from label-first to measurement-first, saves time and makes it easier to decide whether an item is worth ordering in the first place.
Why Accurate Measurements Matter for Online and Secondhand Shopping
The headache usually starts the same way. You order two sizes because the brand chart looks vague, one arrives too small, the other hangs oddly, and now you're managing returns instead of styling outfits.
That's exactly where a clothing measurement guide earns its keep. When sizing varies by brand, platform, and even garment category, exact measurements give you a stable reference point, especially on resale sites where the seller may have altered, shrunk, or re-tagged an item.
Why size labels can't do the job alone
The historical move toward standardized sizing never produced one universal system, and that gap still shows up in modern shopping. The U.S. standard for boys' ready-to-wear clothing exists to define body measurements for garment production and pattern guidance, but manufacturers still set their own sizes in commercial practice, which is why cross-brand comparison remains messy (government standard reference).
Practical rule: treat the size tag as a clue, not a decision.
That's especially true on marketplaces like Depop or Vinted, where the same tagged size can hide different proportions, stretches, or previous alterations. A measurement-first workflow helps you compare what's being sold, not what the label promises.
For shoppers who hop between brand sites and resale apps, the smartest habit is simple, check the exact garment dimensions before you click buy. If a listing gives you pit-to-pit, waist, inseam, or sleeve length, you can compare those values against your own notes instead of relying on a chart that may not match the brand's real-world cut.
Preparing to Measure Tools and Prerequisites
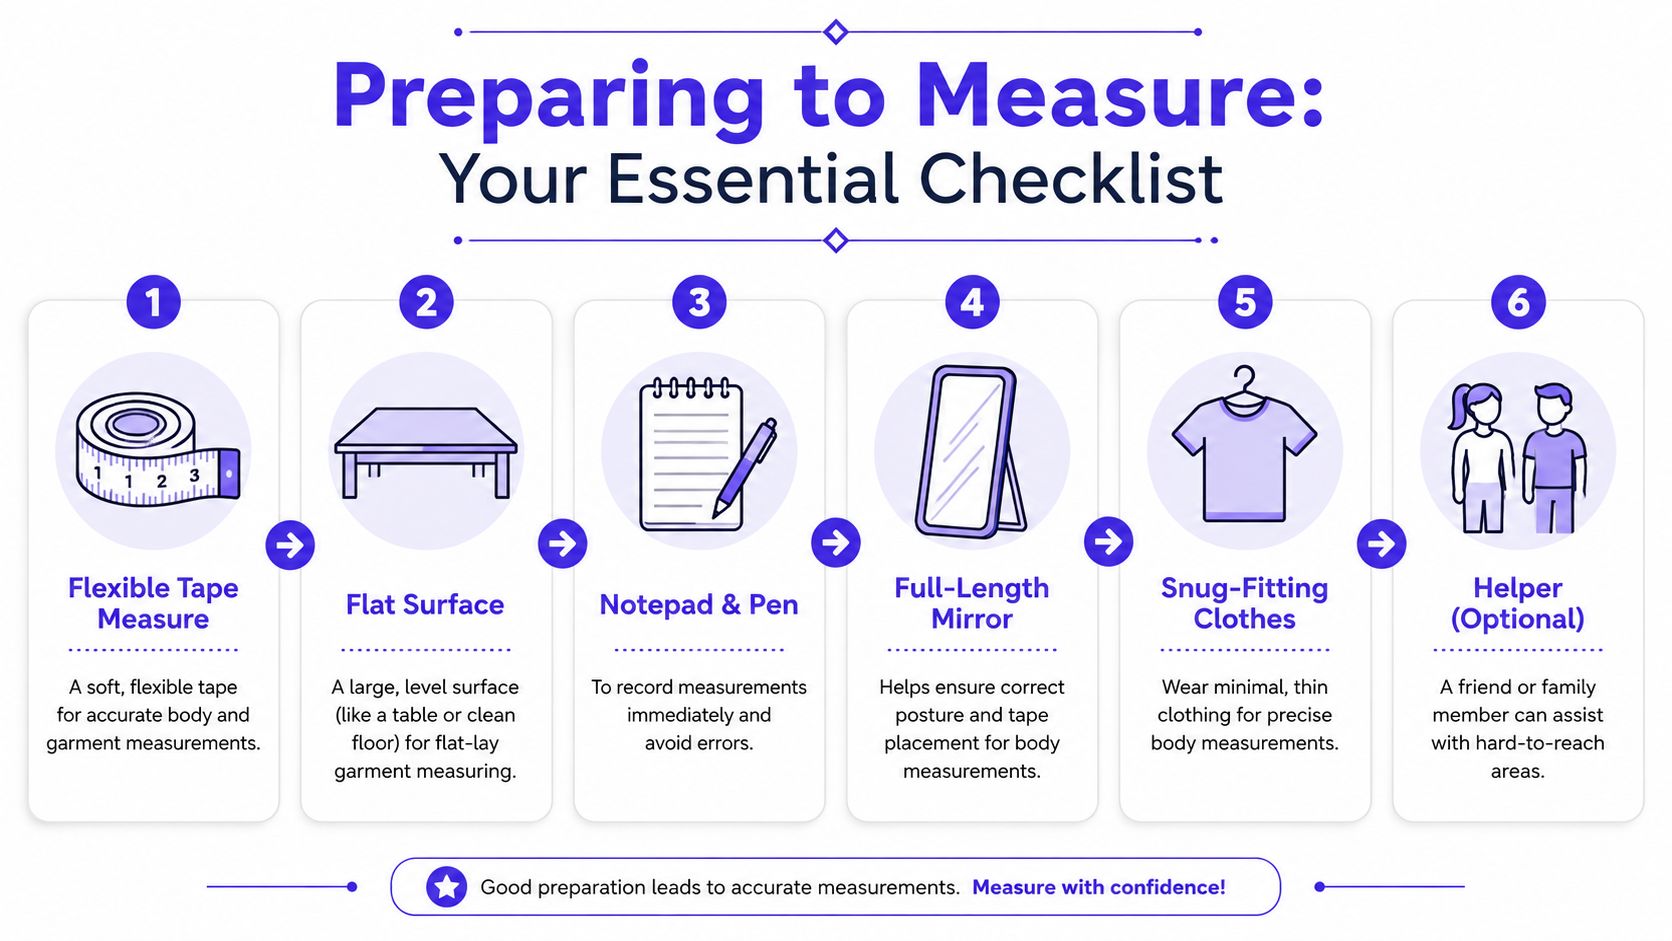
Before you measure anything, set the scene properly. A sloppy setup creates bad numbers, and bad numbers lead to bad purchases.
Start with a flexible measuring tape, a flat surface for garment checks, and a notepad or phone to record each number right away. A full-length mirror helps with posture and tape placement, and a helper is useful for hard-to-reach spots like back length or shoulder span.
Set up the body before you set up the tape
Wear thin clothing, ideally something close to the body, so the tape sits on the shape you are measuring. Stand upright, breathe normally, and avoid sucking in or bracing, because posture changes can distort torso and waist readings.
For flat-lay garment measuring, use a calm, level surface and a calibrated ruler or tape. If the fabric is warped, wrinkled, or stretched, the number won't tell you much.
A clean setup matters more than people think, because small tape errors add up fast when you're comparing a body measurement to a garment listing.
If you're building a habit, keep one notes file for all your measurements and another for garment dimensions you trust. That way, when a seller on Amazon, Shein, or a local marketplace posts dimensions, you can compare them immediately instead of measuring yourself from scratch each time.
How to Take Body Measurements for Tops Bottoms Dresses and Outerwear
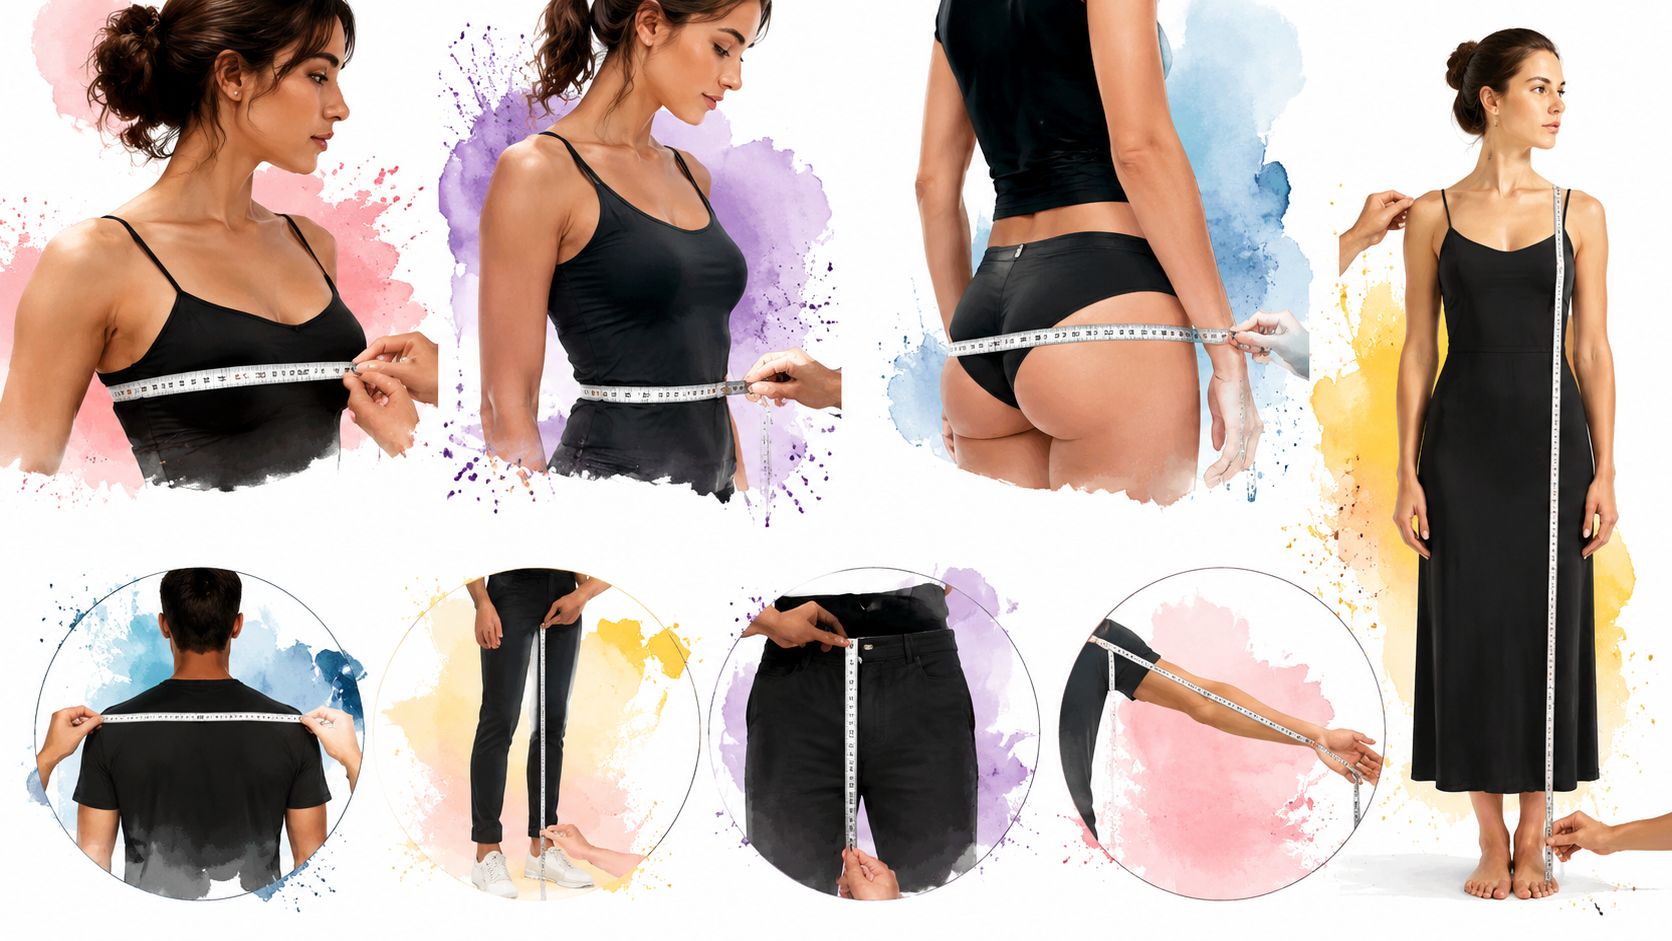
For a strong baseline, start with the core dimensions most guides rely on, bust or chest, waist, and hip. A foundational guide then expands into neck, sleeve length, shoulder width, and overall length depending on the item, which matches standard body-sizing references used across apparel categories (Craft Yarn Council body sizing).
Measure the body in consistent landmarks
Chest or bust should sit at the fullest point around the torso. Waist should be the natural waist, not where the waistband happens to land on your jeans, and hip should be the fullest part of the seat and upper hip area.
Record each number twice, once in inches and once in centimeters, so you're not locked into a single store's product page format. That's especially helpful when you're comparing garments from different regions or reading secondhand listings written by different sellers.
Match the measurement to the garment type
Tops usually need shoulder width and sleeve length in addition to chest. Dresses often need overall length, while coats and jackets benefit from shoulder span and sleeve reach because those details change how the silhouette sits on your frame.
For sleeve details, it's useful to cross-check a dedicated reference like how to measure sleeve length so you're not guessing where the tape should start or stop. That's one of those numbers that can make a shirt look polished or awkward even when everything else seems right.
A visual reference can help here too.
<iframe width="100%" style="aspect-ratio: 16 / 9;" src="https://www.youtube.com/embed/jvGEVbgIXPU" frameborder="0" allow="autoplay; encrypted-media" allowfullscreen></iframe>Keep a personal measurement log
Write down the date, the garment type, and any notes about posture or layering. If you've changed weight, started lifting, or altered your stance, your measurements can shift enough that an old note stops being useful.
Useful habit: measure once carefully, then keep the numbers where you can actually find them when a listing looks promising.
That log becomes your shopping shortcut. When you're looking at dresses, outerwear, or a jacket from a different brand, you can compare the product dimensions to your own body notes without rethinking the basics every time.
How to Measure Flat-Lay Garments and Use Conversion Charts
When a seller posts flat-lay dimensions, the garment is doing the talking for you. That's useful because flat-lay measurements are more stable than size labels across brands, especially when taken on a relaxed garment with calibrated tools and repeated samples (flat-lay measurement guidance).
Lay the item flat and read the shape, not the hanger
Smooth the garment on a level surface, but don't stretch it. Measure from fixed points like pit to pit, shoulder to shoulder, waistband edge, inseam, leg opening, or total length depending on the category.
A lot of online shoppers get tripped up by circumference math, so keep one rule in mind. If a top is listed as 20 inches pit to pit, that's typically a flat width, not the full chest circumference, so you'd compare it accordingly instead of treating it like a body measurement.
For more examples of how a flat-lay workflow is used in product photos, see flat-lay clothing photography. That style of presentation makes it easier to read the dimensions before you decide whether the piece belongs in your cart.
Use a simple conversion table
| Inches | Centimeters |
|---|---|
| 10 | 25.4 |
| 12 | 30.5 |
| 14 | 35.6 |
| 16 | 40.6 |
| 18 | 45.7 |
| 20 | 50.8 |
| 22 | 55.9 |
| 24 | 61.0 |
| 26 | 66.0 |
| 28 | 71.1 |
Use that chart to move quickly between listings written in different units. If one seller uses inches and another uses centimeters, you don't need to guess, you can compare them on the same scale.
Watch the waistband carefully
Elastic waistbands are the one spot where relaxed and stretched readings can diverge a lot. If the listing doesn't say which method was used, ask before you buy, especially for pants and skirts where the waistband determines most of the wearing comfort.
I'd rather trust a clearly measured garment than a vague size tag every time. Once you get used to comparing body notes to flat-lay dimensions, shopping gets a lot less random.
Avoiding Common Measurement Mistakes and Troubleshooting Online
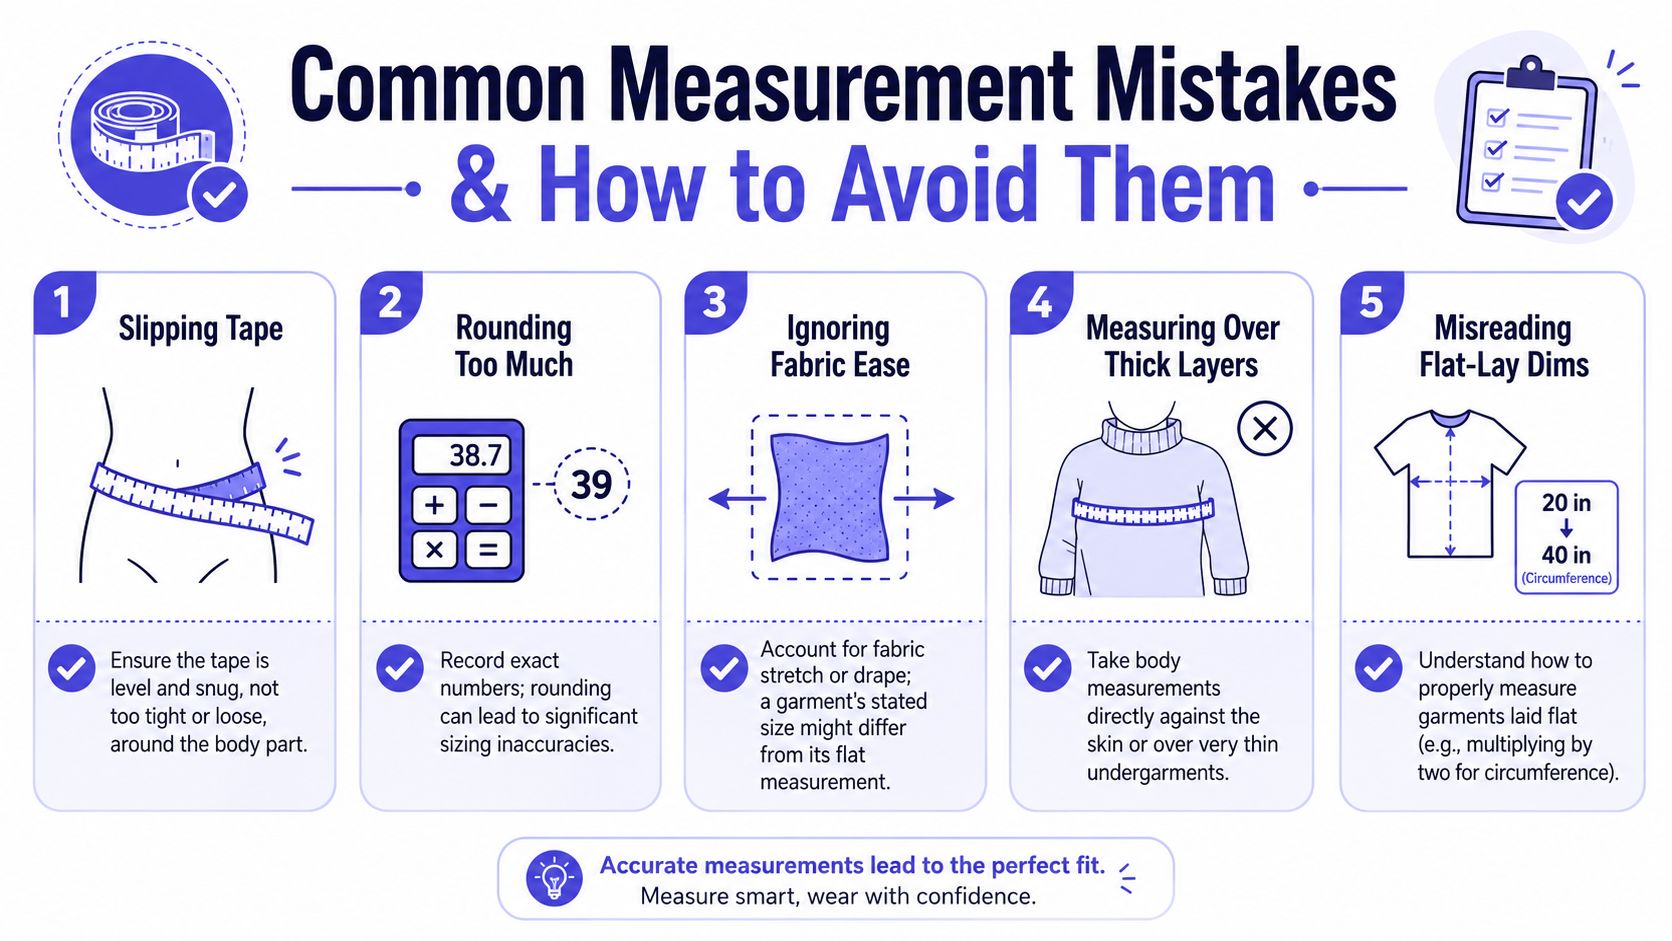
The most common mistakes are rarely dramatic. They're usually small, tape slippage, measuring over thick layers, rounding too aggressively, or misreading a flat-lay width as a full circumference.
Fix the errors before they become returns
If the tape moves, remeasure until it lies level and snug, not tight. If you recorded a number from over a hoodie or sweater, take it again against thin clothing because bulk changes the result.
Sizing inconsistency is still a structural issue, and a 2024 study of women's jeans across major brands found that identical label sizes didn't reliably map to the same body measurements (jeans sizing reference). That's why one listing can look right on paper and still disappoint in real life.
Use these checks when a listing looks suspicious
- Ask for missing dimensions: If a seller only gives size and no garment specs, request pit-to-pit, length, sleeve length, inseam, or rise as needed.
- Check fabric behavior: Stretch fabrics can wear differently from rigid denim or woven cotton, so a flat measurement may need some ease.
- Compare with a known garment: Pull out a shirt or pair of pants you already love and measure that item against the listing.
- Look for asymmetry: Some handmade or altered pieces won't be even side to side, so one quick number may miss its true shape.
A careful buyer doesn't just measure once and hope. They measure, compare, and then decide whether the garment's shape matches the outfit they want to wear.
Using the TryThisFit Chrome Extension for Instant Visual Previews
Once your measurements are saved, visual shopping gets easier. TryThisFit's Chrome extension uses a right-click on any product image to deliver an instant preview in seconds, and it installs in a couple of seconds as well (Chrome extension workflow).
Try styles without leaving the page
You can install the free extension at trythisfit.com/go/extension/chrome, then browse clothing pages on Zara, H&M, Amazon, Shein, Vinted, or Depop and right-click the product image to preview the style. It works on any site with clothing photos, so you're not stuck jumping between tabs or saving screenshots.
TryThisFit is built for how clothes show up online, especially when the product page uses a flat-lay image. The extension is optimized for those images because they give the clearest visual read of the garment's appearance.
Use it for shopping, resale, and costumes
The workflow becomes practical. For secondhand listings, a quick visual preview helps you decide whether a piece matches your style before you message the seller. For Halloween costumes, it's an easy way to see how the look lands without buying blind.
The app also keeps the focus on appearance, not sizing. It's meant to help you see how it looks and visualize the style, not to tell you whether the clothes fit.
If you want to keep a record of past try-ons, save them in your history at your try-on history. Then you can compare looks later instead of hunting through old tabs.
Conclusion Next Steps and Resources
A good clothing measurement guide turns shopping from guesswork into a simple comparison process, body notes first, garment dimensions second, and style preview last. If you want to keep going, try the main app at TryThisFit, save your favorite previews in /history, and keep this guide handy the next time a size chart starts feeling vague.
A CTA for TryThisFit.
Try Virtual Try-On Now
See how clothes look on you before you buy - works with any online store
Get Started Free